Timer in C#
The Timer control allows you to set a time interval to execute an event after that interval continuously. It is useful when you want to execute certain applications after a certain interval. Say you want to create a backup of your data processing in every hour. You can make a routine which will take the backup and call that routine on Timer's event and set timer interval for an hour.
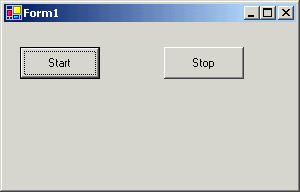
Using timer control is very simple. To test the control, I'm going to create a Windows Application. I also add two button controls to the form and change their text to Start and Stop as you can see from the following Figure.

In this application, I'm going to create a text file mcb.txt in your C:\temp directory and start writing the time after 5 seconds interval. Stop button stops the timer and Start again start the timer.
Note: If you do not have a temp folder on your C:\ Drive, you must change this path.
Now you can drag a timer control from the toolbox to the form from Toolbox of Visual Studio. You can set timer properties from the IDE as well as programmatically. To set the timer properties, right click on the timer control and change Interval property. As you can see from the Figure,
I put 5000 milliseconds (5 seconds).
1 sec = 1000 milliseconds.

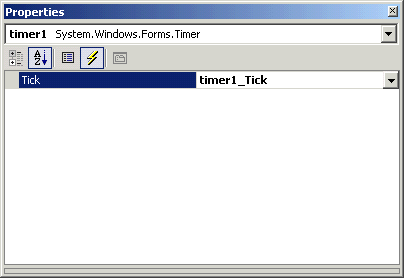
Now click on the Events button and write event for the timer click as you can see from the following figure.

Now I add a FileStream and a StreamWriter object in the beginning of the class. As you can see from the following code, FileStream class creates a mcb.txt file and StreamWriter will be used to write to the file.
private static FileStream fs = new FileStream(@"c:\temp\mcb.txt", FileMode.OpenOrCreate, FileAccess.Write);private static StreamWriter m_streamWriter = new StreamWriter(fs);
Now write the following code on the Form Load event:
private void Form1_Load(object sender, System.EventArgs e)
{// Write to the file using StreamWriter classm_streamWriter.BaseStream.Seek(0, SeekOrigin.End);
m_streamWriter.Write(" File Write Operation Starts : ");
m_streamWriter.WriteLine("{0} {1}", DateTime.Now.ToLongTimeString(),DateTime.Now.ToLongDateString());
m_streamWriter.WriteLine(" ===================================== \n");
m_streamWriter.Flush();
}
As you can see from the above code, this code writes some lines to the file.
Now write code on the start and stop button click handlers. As you can see from the following code, the Start button click sets timer's Enabled property as true. Setting timer's Enabled property starts timer to execute the timer event. I set Enabled property as false on the Stop button click event handler, which stops executing the timer tick event.
private void button1_Click(object sender, System.EventArgs e)
{
timer1.Enabled = true;
}private void button2_Click(object sender, System.EventArgs e)
{
timer1.Enabled = false;
}
Now last step is to write timer's tick event to write current time to the text file. Write the following code on your timer event.
private void timer1_Tick(object sender, System.EventArgs e)
{
m_streamWriter.WriteLine("{0} {1}", DateTime.Now.ToLongTimeString(),DateTime.Now.ToLongDateString());
m_streamWriter.Flush();
}
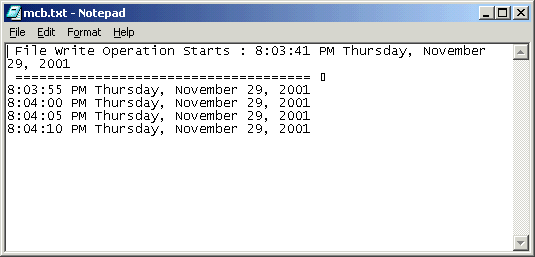
Now use Start and Stop buttons to start and stop the timer. The output mcb.txt file looks like the following figure.

Using Timer control Programmatically
If you don't have Visual Studio .NET, you can also write the same sample. Just following these steps.
Creating an instance of Timer
The Timer class's constructor is used to create a timer object. The constructor is overloaded.
Public Timer()
Public Timer(double) Sets the interval property to the specified.
Here is how to create a Timer with 5 seconds interval.
Timer myTimer = new Timer(500);
Here are some useful members of the Timer class:
Tick This event occurs when the Interval has elapsed. Start Starts raising the Tick event by setting Enabled to true. Stop Stops raising the Tick event by setting Enabled to false. Close Releases the resources used by the Timer. AutoReset Indicates whether the Timer raises the Tick event each time the specified Interval has elapsed or whether the Tick event is raised only once after the first interval has elapsed. Interval Indicates the interval on which to raise the Tick event. Enabled Indicates whether the Timer raises the Tick event.
How to use Timer class to raise an event after certain interval?
timer1.Interval = 5000;
timer1.Enabled = true;
timer1.Tick += new System.EventHandler (OnTimerEvent);Write the event handler
This event will be executed after every 5 secs.
public static void OnTimerEvent(object source, EventArgs e)
{
m_streamWriter.WriteLine("{0} {1}", DateTime.Now.ToLongTimeString(),DateTime.Now.ToLongDateString());
m_streamWriter.Flush();
}
You use Stop and Close events to stop the timer and release the resources. See attached project for more details
Using timer control is very simple. To test the control, I'm going to create a Windows Application. I also add two button controls to the form and change their text to Start and Stop as you can see from the following Figure.

In this application, I'm going to create a text file mcb.txt in your C:\temp directory and start writing the time after 5 seconds interval. Stop button stops the timer and Start again start the timer.
Now you can drag a timer control from the toolbox to the form from Toolbox of Visual Studio. You can set timer properties from the IDE as well as programmatically. To set the timer properties, right click on the timer control and change Interval property. As you can see from the Figure,
I put 5000 milliseconds (5 seconds).
1 sec = 1000 milliseconds.

Now click on the Events button and write event for the timer click as you can see from the following figure.

Now I add a FileStream and a StreamWriter object in the beginning of the class. As you can see from the following code, FileStream class creates a mcb.txt file and StreamWriter will be used to write to the file.
private static FileStream fs = new FileStream(@"c:\temp\mcb.txt", FileMode.OpenOrCreate, FileAccess.Write);private static StreamWriter m_streamWriter = new StreamWriter(fs);
Now write the following code on the Form Load event:
private void Form1_Load(object sender, System.EventArgs e)
{// Write to the file using StreamWriter classm_streamWriter.BaseStream.Seek(0, SeekOrigin.End);
m_streamWriter.Write(" File Write Operation Starts : ");
m_streamWriter.WriteLine("{0} {1}", DateTime.Now.ToLongTimeString(),DateTime.Now.ToLongDateString());
m_streamWriter.WriteLine(" ===================================== \n");
m_streamWriter.Flush();
}
As you can see from the above code, this code writes some lines to the file.
Now write code on the start and stop button click handlers. As you can see from the following code, the Start button click sets timer's Enabled property as true. Setting timer's Enabled property starts timer to execute the timer event. I set Enabled property as false on the Stop button click event handler, which stops executing the timer tick event.
private void button1_Click(object sender, System.EventArgs e)
{
timer1.Enabled = true;
}private void button2_Click(object sender, System.EventArgs e)
{
timer1.Enabled = false;
}
Now last step is to write timer's tick event to write current time to the text file. Write the following code on your timer event.
private void timer1_Tick(object sender, System.EventArgs e)
{
m_streamWriter.WriteLine("{0} {1}", DateTime.Now.ToLongTimeString(),DateTime.Now.ToLongDateString());
m_streamWriter.Flush();
}
Now use Start and Stop buttons to start and stop the timer. The output mcb.txt file looks like the following figure.

Using Timer control Programmatically
If you don't have Visual Studio .NET, you can also write the same sample. Just following these steps.
Creating an instance of Timer
The Timer class's constructor is used to create a timer object. The constructor is overloaded.
Public Timer()
Public Timer(double) Sets the interval property to the specified.
Here is how to create a Timer with 5 seconds interval.
Timer myTimer = new Timer(500);
Here are some useful members of the Timer class:
timer1.Interval = 5000;
timer1.Enabled = true;
timer1.Tick += new System.EventHandler (OnTimerEvent);Write the event handler
This event will be executed after every 5 secs.
public static void OnTimerEvent(object source, EventArgs e)
{
m_streamWriter.WriteLine("{0} {1}", DateTime.Now.ToLongTimeString(),DateTime.Now.ToLongDateString());
m_streamWriter.Flush();
}
You use Stop and Close events to stop the timer and release the resources. See attached project for more details
Menggunakan Timer dalam Program
Timer adalah salah satu komponen dalam pemrograman yang sering kita pakai. Komponen timer ini biasa kita gunakan untuk menjalankan proses secara rutin pada saat-saat tertentu. Proses itu bisa hanya sekali dijalankan atau diulang per-satuan waktu sesuai dengan interval waktu yang ditentukan dalam komponen timer ini. Kita akan mempelajarinya dengan contoh.
Kita akan membuat sebuah program yang berisi 9 buah komponen label, satu buah tombol, dan satu buah komponen timer. Setiap Label akan berubah warnanya setiap 100ms.
Pada saat tombol mulai diklik, warna label akan berubah bergantian dari label pertama sampai label ke-9. Perubahan warna ini dikontrol dengan menggunakan komponen timer yang kita set interval waktunya adalah 100ms. Gambaran dari program ini adalah seperti yang terlihat pada gambar berikut ini:
Rutin implementasi nya adalah seperti yang tertulis dibawah ini.
- using System;
- using System.Windows.Forms;
- public class MyTimer : Form
- {
- private System.Windows.Forms.Label label1;
- private System.Windows.Forms.Label label2;
- private System.Windows.Forms.Label label3;
- private System.Windows.Forms.Label label4;
- private System.Windows.Forms.Label label5;
- private System.Windows.Forms.Label label6;
- private System.Windows.Forms.Label label7;
- private System.Windows.Forms.Label label8;
- private System.Windows.Forms.Label label9;
- private System.Windows.Forms.Button btnStart;
- private System.Windows.Forms.Timer timer1;
- private int index;
- private System.ComponentModel.IContainer components = null;
- public MyTimer()
- {
- components = new System.ComponentModel.Container();
- label1 = new System.Windows.Forms.Label();
- label2 = new System.Windows.Forms.Label();
- label3 = new System.Windows.Forms.Label();
- label4 = new System.Windows.Forms.Label();
- label5 = new System.Windows.Forms.Label();
- label6 = new System.Windows.Forms.Label();
- label7 = new System.Windows.Forms.Label();
- label8 = new System.Windows.Forms.Label();
- label9 = new System.Windows.Forms.Label();
- btnStart = new System.Windows.Forms.Button();
- timer1 = new System.Windows.Forms.Timer(components);
- //
- // label1
- //
- label1.BackColor = System.Drawing.Color.Lime;
- label1.Location = new System.Drawing.Point(20, 30);
- label1.Size = new System.Drawing.Size(61, 34);
- label1.Text = "1";
- label1.TextAlign = System.Drawing.ContentAlignment.MiddleCenter;
- //
- // label2
- //
- label2.BackColor = System.Drawing.Color.White;
- label2.Location = new System.Drawing.Point(87, 30);
- label2.Size = new System.Drawing.Size(61, 34);
- label2.Text = "2";
- label2.TextAlign = System.Drawing.ContentAlignment.MiddleCenter;
- //
- // label3
- //
- label3.BackColor = System.Drawing.Color.White;
- label3.Location = new System.Drawing.Point(154, 30);
- label3.Size = new System.Drawing.Size(61, 34);
- label3.Text = "3";
- label3.TextAlign = System.Drawing.ContentAlignment.MiddleCenter;
- //
- // label4
- //
- label4.BackColor = System.Drawing.Color.White;
- label4.Location = new System.Drawing.Point(20, 74);
- label4.Size = new System.Drawing.Size(61, 34);
- label4.Text = "4";
- label4.TextAlign = System.Drawing.ContentAlignment.MiddleCenter;
- //
- // label5
- //
- label5.BackColor = System.Drawing.Color.White;
- label5.Location = new System.Drawing.Point(87, 74);
- label5.Size = new System.Drawing.Size(61, 34);
- label5.Text = "5";
- label5.TextAlign = System.Drawing.ContentAlignment.MiddleCenter;
- //
- // label6
- //
- label6.BackColor = System.Drawing.Color.White;
- label6.Location = new System.Drawing.Point(154, 74);
- label6.Size = new System.Drawing.Size(61, 34);
- label6.Text = "6";
- label6.TextAlign = System.Drawing.ContentAlignment.MiddleCenter;
- //
- // label7
- //
- label7.BackColor = System.Drawing.Color.White;
- label7.Location = new System.Drawing.Point(20, 118);
- label7.Size = new System.Drawing.Size(61, 34);
- label7.Text = "7";
- label7.TextAlign = System.Drawing.ContentAlignment.MiddleCenter;
- //
- // label8
- //
- label8.BackColor = System.Drawing.Color.White;
- label8.Location = new System.Drawing.Point(87, 118);
- label8.Size = new System.Drawing.Size(61, 34);
- label8.Text = "8";
- label8.TextAlign = System.Drawing.ContentAlignment.MiddleCenter;
- //
- // label9
- //
- label9.BackColor = System.Drawing.Color.White;
- label9.Location = new System.Drawing.Point(154, 118);
- label9.Size = new System.Drawing.Size(61, 34);
- label9.Text = "9";
- label9.TextAlign = System.Drawing.ContentAlignment.MiddleCenter;
- //
- // btnStart
- //
- btnStart.Location = new System.Drawing.Point(140, 167);
- btnStart.Size = new System.Drawing.Size(75, 23);
- btnStart.Text = "Mulai";
- btnStart.Click += new System.EventHandler(btnStart_Click);
- //
- // timer1
- //
- timer1.Interval = 1000;
- timer1.Tick += new System.EventHandler(timer1_Tick);
- //
- // Form6
- //
- Size = new System.Drawing.Size(480, 230);
- Controls.Add(btnStart);
- Controls.Add(label9);
- Controls.Add(label5);
- Controls.Add(label3);
- Controls.Add(label8);
- Controls.Add(label7);
- Controls.Add(label6);
- Controls.Add(label4);
- Controls.Add(label2);
- Controls.Add(label1);
- Text = "Demo Pemakaian Timer (http://abcsharpind.blogspot.com)";
- index = 0;
- }
- private void btnStart_Click(object sender, EventArgs e)
- {
- timer1.Enabled = !timer1.Enabled;
- if (timer1.Enabled)
- {
- btnStart.Text = "Selesi";
- }
- else
- {
- btnStart.Text = "Mulai";
- }
- }
- private void timer1_Tick(object sender, EventArgs e)
- {
- index = (index + 1) % 9;
- switch (index)
- {
- case 0:
- label9.BackColor = System.Drawing.Color.White;
- label1.BackColor = System.Drawing.Color.Lime;
- break;
- case 1:
- label1.BackColor = System.Drawing.Color.White;
- label2.BackColor = System.Drawing.Color.Lime;
- break;
- case 2:
- label2.BackColor = System.Drawing.Color.White;
- label3.BackColor = System.Drawing.Color.Lime;
- break;
- case 3:
- label3.BackColor = System.Drawing.Color.White;
- label4.BackColor = System.Drawing.Color.Lime;
- break;
- case 4:
- label4.BackColor = System.Drawing.Color.White;
- label5.BackColor = System.Drawing.Color.Lime;
- break;
- case 5:
- label5.BackColor = System.Drawing.Color.White;
- label6.BackColor = System.Drawing.Color.Lime;
- break;
- case 6:
- label6.BackColor = System.Drawing.Color.White;
- label7.BackColor = System.Drawing.Color.Lime;
- break;
- case 7:
- label7.BackColor = System.Drawing.Color.White;
- label8.BackColor = System.Drawing.Color.Lime;
- break;
- case 8:
- label8.BackColor = System.Drawing.Color.White;
- label9.BackColor = System.Drawing.Color.Lime;
- break;
- }
- }
- public static void Main()
- {
- Application.EnableVisualStyles();
- Application.SetCompatibleTextRenderingDefault(false);
- MyTimer p ;
- p = new MyTimer();
- Application.Run(p);
- }
- }


0 Comments:
Posting Komentar